Loom is another type of screencasting software, and their pro version is now free for students and teachers.
Differences between Loom and Screencastify
The biggest difference is for students. They can record unlimited length screencasts with Loom Pro vs the 5 minutes they are limited to with Screencastify.
Another difference is the storage of the video. By default, Loom stores the video themselves, and gives the user a link to share. If you want the video in Google Drive you will need to download the video and then upload it to Google Drive.
Loom saves the videos as in the .mp4 format, making the videos a lot easier to use in video editing software such as Canva and Adobe Spark.
Finally, Loom puts your video into a circle, and you can change the size of the webcam video during the recording, even making it the size of the screen.
Installing Loom
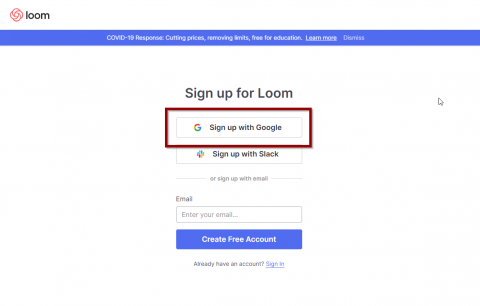
I’m not pushing out the Loom extension at this point, I don’t want to overwhelm everyone with yet another tool. To get started, head on over to loom.com. Click Get Loom for Free.

then Sign Up with Google.
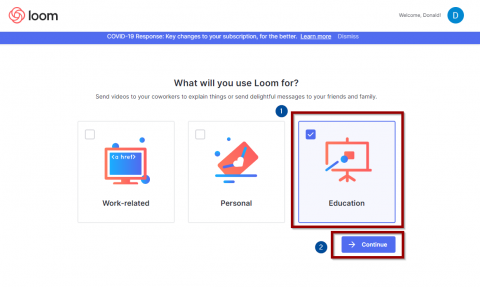
Choose your school Google account. Read through the terms of service and click I Agree. Select Education and then Continue.
Select Not Now for notifications. A message in the middle will let you know that you have access to the Pro version.
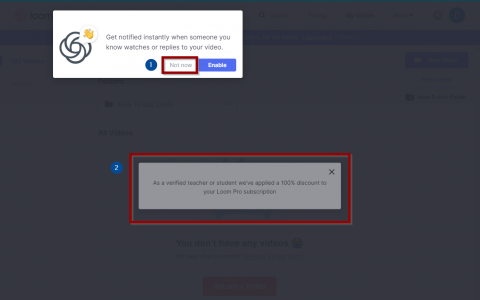
If the site doesn’t say you are a verified teacher or student, check that you used your Kenton City Schools’ Google account.
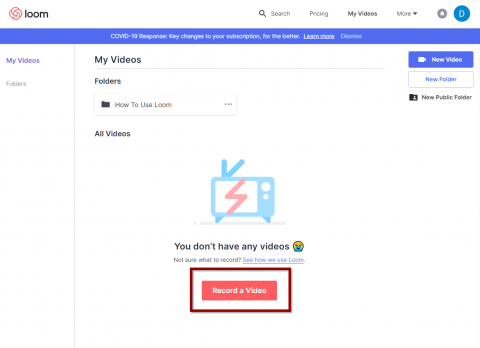
Your account is now good to go, we need to finish the set up by installing the Chrome extension so we can actually record a screencast.
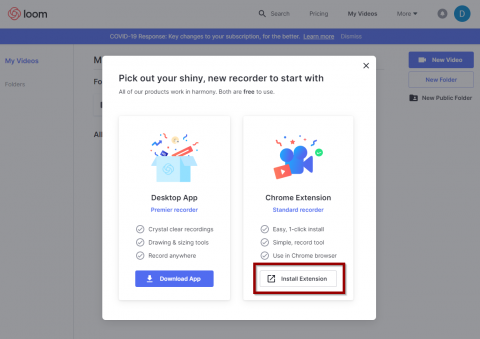
Click Record a video now.
And then Install Extension.
You’ll be redirected to the Google Chrome Webstore. Click the Add to Chrome button.
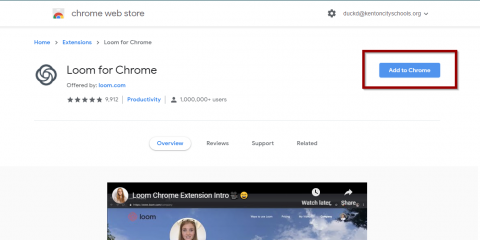
Chrome will ask you to verify the permissions, click Add Extension.
You’re now ready to start recording!
Your first Loom recording
To record a screencast, click on the Loom icon in your Chrome Toolbar.
![]()
The first time you access the extension, the extension will ask for permission to use your microphone and camera. Click One-Click Access. Chrome will now ask for permission to use the microphone and camera.
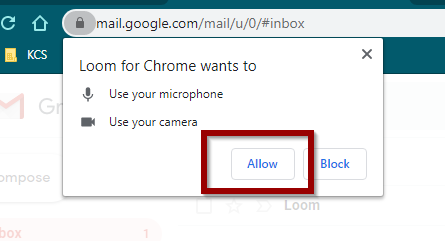
Click Allow. You’re now ready to record. Click Start Recording to capture your entire screen and your webcam. You can adjust what Loom records through the window. If you are capturing your entire desktop, Loom will ask you to share your screen.

You’ll almost always select screen 1 and then Share. Loom will start recording. To stop recording, you can click on the stop button down by the webcam or click on the toolbar icon.
After recording
You can explore on your own or let Loom guide you. The recording can be renamed, trimmed, or the link to the video copied. If you want to use the video in an app such as Google Slides, you will need to download the movie file and upload it to Google Drive.
Loom can daunting, but that’s mainly because it is more powerful than Screencastify. I would recommend staying with Screencastify as you get comfortable with Screencasting. But, if you have students that need to record more than 5 minutes or you would like some more powerful tools than what’s available with Screencastify, then check out Loom.
More help can be found on Loom’s support site.